Django is a Python Web framework that encourages rapid development and clean, pragmatic design.Before we learn how to tango with Django lets go in detail about it’s installation which is herculean task. We did struggle a lot while installing it, so thought of guiding you through the whole process. Hope this helps you all newbies out there struggling with installation of Django on windows platform.
Prior to installation of Django on your windows operating system , get your system set with the following :
1. Xampp should have been residing on your system and, if not present on your system use the following link to install Xampp :
2. Download Python 2.7 Apache 3.4 MSI Installer 32 bit (Based on your system requirements)
Use the following link to download python :
INSTALLATION STEPS
STEP 1
Change Environmental variable:
Reach the Environmental Variable destination by following the below path :
Computer properties -> Advanced system settings -> Environment variable -> Path
Now that you have reached the destination ,add the path of python(Click properties on the python 2.7 installed in your C Drive to get the path) installed on your system to the existing variable value. Follow the example below :
Before addition of path to the Python folder

After addition of the path of Python folder

STEP 2
To check whether python path has been successfully added to your system environmental path , follow as given below :
To check whether python path has been successfully added to your system environmental path , follow as given below :
Open command prompt(cmd) in windows and type python.
It leads you to python shell. Type exit() to exit from python shell.
congrats!!!!! You have successfully installed Python.

congrats!!!!! You have successfully installed Python.
STEP 3
Get the code from
Get the code from

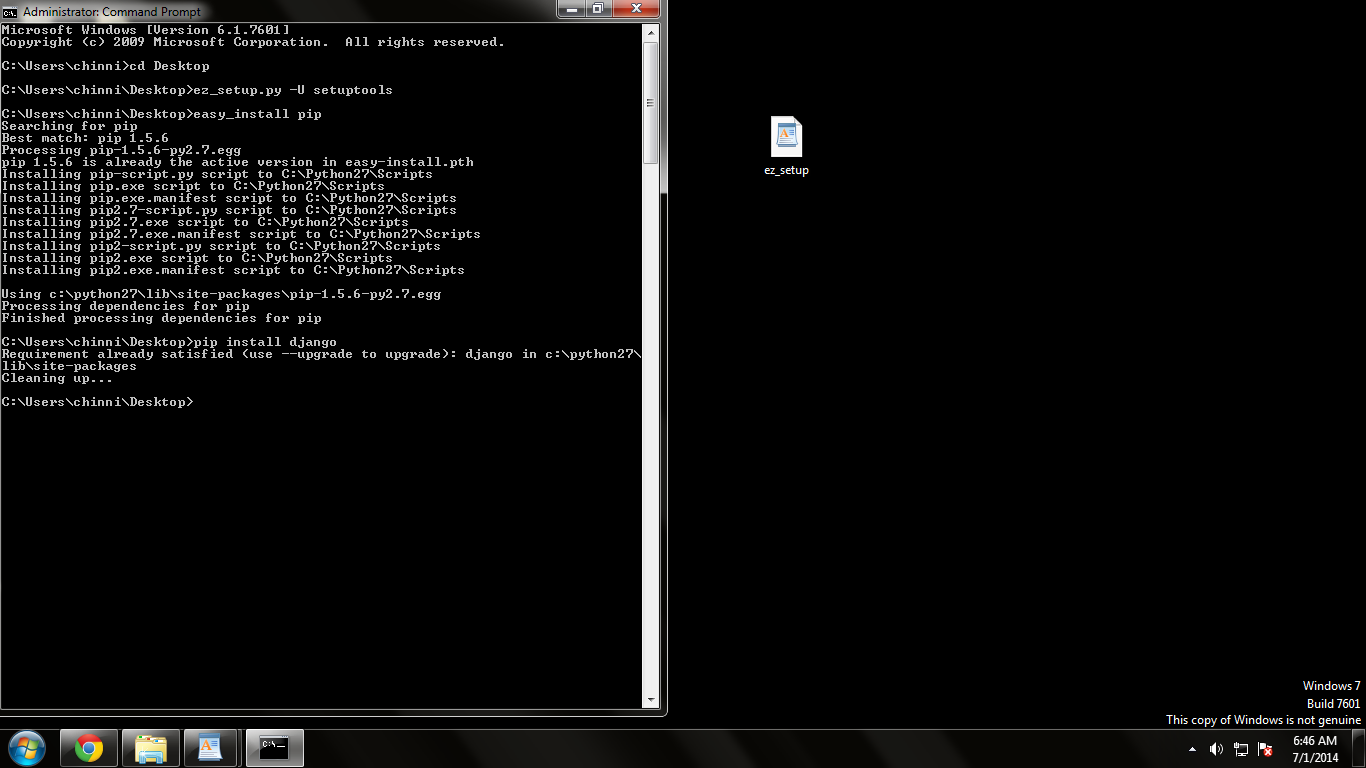
Copy the above contents into a newly created file named ez_setup.py and save it on your desktop.
- Open command prompt(cmd) and type the following command:
- cd desktop
- python ez_setup.py or ez_setup.py -U setuptools. [This downloads the python setuptools. ( Now in your C drive you can view Python27 folder and the script which has pip (pip is python manager).]
- easy_install pip(This installs pip.exe)
- pip install django ( As a result ,django-admin.py takes its place in C:/Python27/)
STEP 4
Lead yourself to http://www.lfd.uci.edu/~gohlke/pythonlibs/#mod_wsgi and lookout for mod_wsgi-3.4.ap24.win32-py2.7 which falls under Mod_wsgi in the above link.Put mod_wsgi.so in the modules section of apache by following the path below :
Lead yourself to http://www.lfd.uci.edu/~gohlke/pythonlibs/#mod_wsgi and lookout for mod_wsgi-3.4.ap24.win32-py2.7 which falls under Mod_wsgi in the above link.Put mod_wsgi.so in the modules section of apache by following the path below :
C:/ -> xampp -> apache -> modules -> mod_wsgi.so.

STEP 5
Click on config of Apache
Copy loadmodule wsgi_module modules/mod_wsgi.so and save it. Restart the apache server. Now the django server is running.

STEP 6
Reach C Drive in cmd and run the following commands:
Change to Python27 Directory with :
cd python27
Create a directory wherein you can have your django project resided :
md jango
Change to the newly created directory :
cd jango
To start a new django project , type in the following :
python C:\Python27\Lib\site-packages\django\bin\django-admin.py startproject testproject (testproject is name of the project here in the example)
Change the path to the newly created django project :
cd testproject
manage.py is the content of the newly created django project , we go ahead to use one of the command under manage.py to run the server :
python manage.py runserver
The following will be displayed :
Validating models...
0 errors found
July 01, 2014 - 21:40:39
Django version 1.6.5, using settings 'testproject.settings'
Starting development server at http://127.0.0.1:8000/
Quit the server with CONTROL-C.
“It worked !
Congratulation on your first Django-powered page” :)
Congrats!!!!!!!!!!!
You are done with Django installation
Congrats!!!!!!!!!!!
You are done with Django installation